Sending Email Notifications, Reminders, and Accept or Decline Invitations
Emails are automatically sent to tagged resource but you can also manual type an email address for non tagged resources.
Emails can be sent in a few ways:
1, Automatically to the people and customers you tag in your event.
2, Manually to the people and customers you tag in your event using Share.
3, Manually to an address by typing it into the email address field of the event.
4, Reminders to the people and customers you tag in your event just before the event is due to start.
5, Invitations to the people and customers you tag in your event, so they can Accept or Decline.
When an event is added, updated or deleted an email can be automatically sent to the email address of any/all tagged resources.
In the full online version (login from our home page, or press 'Full Online Version' from the app)...
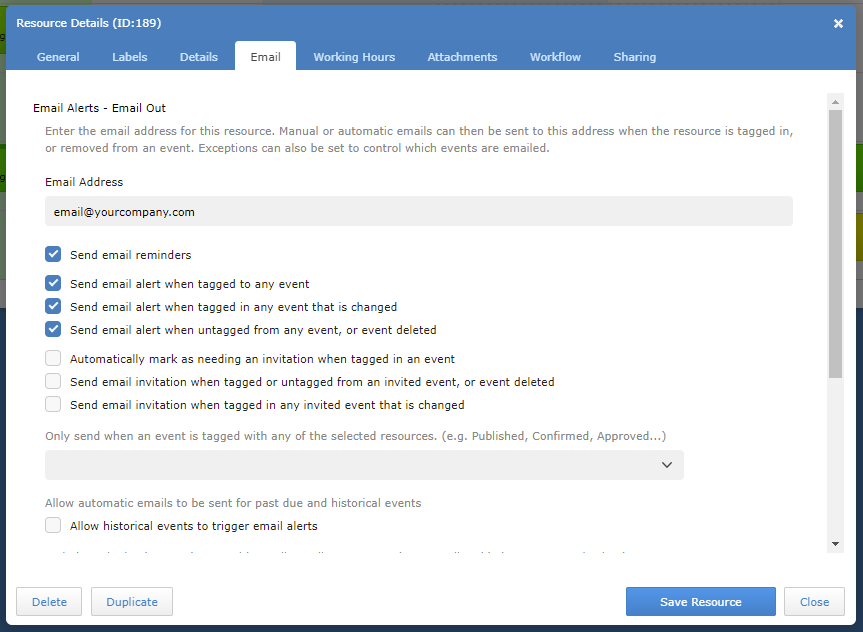
1, Add a valid email address to each of the Resources that you want to send an email to. Access your resources from your Account Settings > Resources page, and click a resources name to edit it.
2, Choose the type of activity that would cause emails to be automatically sent to the resource. Email Alerts are just information telling a person what has been planned. Email Invitations tell a person what you have planned but adds an Accept and Decline button so they can respond.
3, You can use Exceptions to block emails from being sent until a specific resource is tagged in the event. For example you can enable automatic email alerts, but until events are tagged with a resource called Confirmed or Published, nothing is sent. As soon as Confirmed or Published is tagged in the event then emails will be sent.
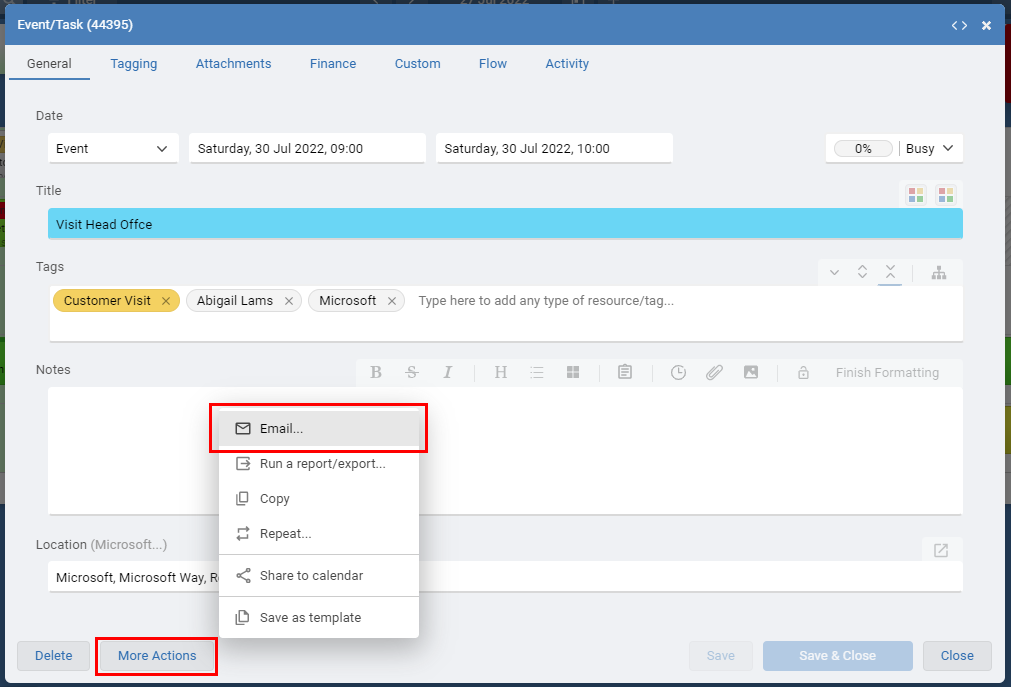
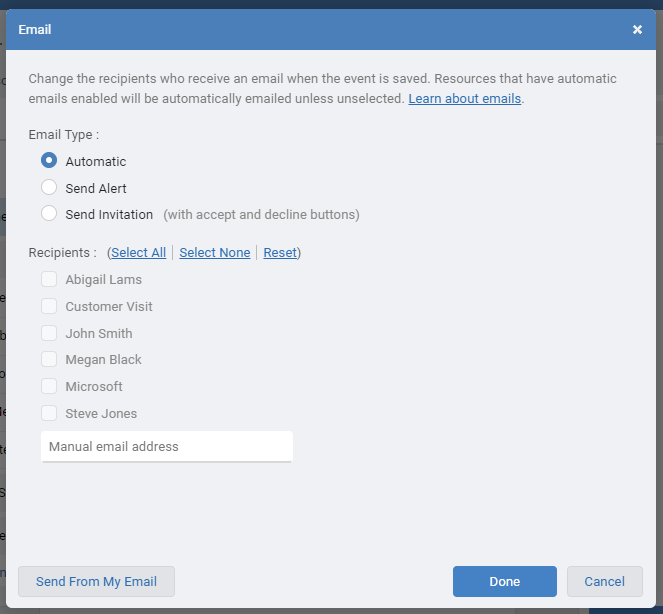
From within an event you can press the More Actions button to see a sub menu where you can select Email. This will send email alerts, or invitations, to the selected tagged resources with an email address.
Emails can also sent for a batch of events from the List View where you can select many events at once then at the bottom choose the batch option Edit > Send All Emails.
Add a valid email address to the events Manual Email Address box found by pressing the More Actions button then Email. Every change to this event will be emailed to the email address specified.
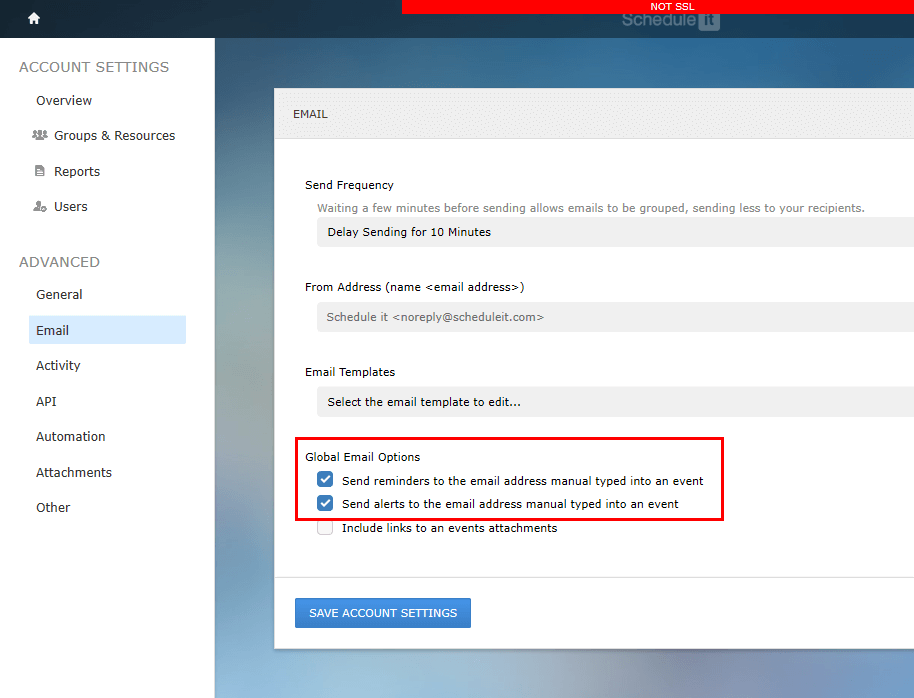
You can change the type of emails that are sent to this address in your Advanced Account Settings > Email page.
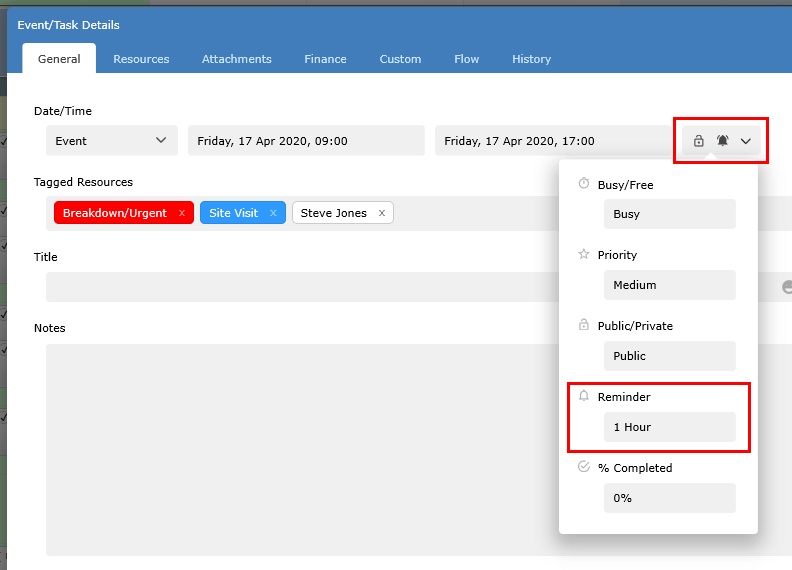
Note: If you are also using our desktop software you must be using version 7.8.32 or higher to prevent any compatibility issues with this new cloud reminder feature.
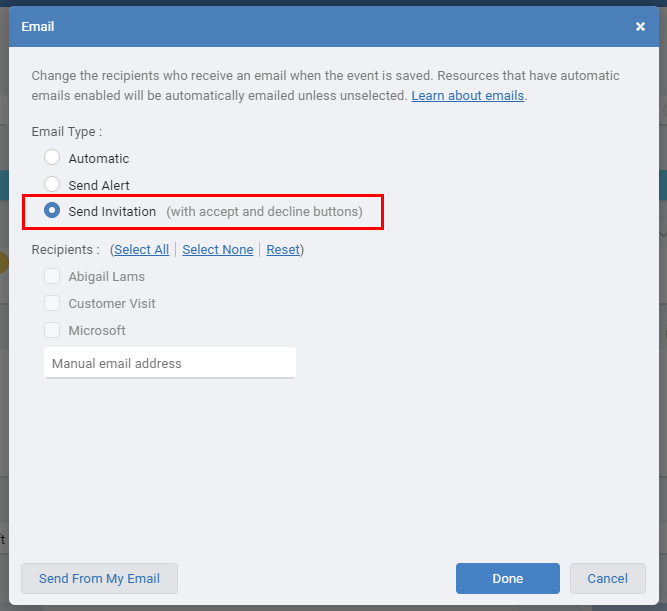
From within an event you can press the More Actions button to see a sub menu where you can select Email. There you can choose to send invitations to the selected tagged resources with an email address.

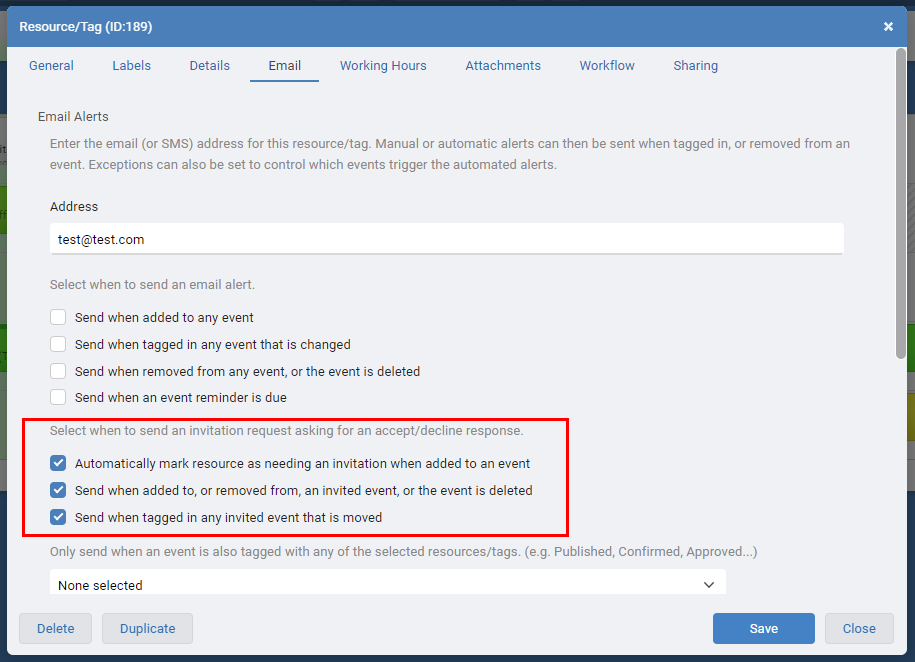
You can also set that a resource always receives an invitation email when events are added or changed in their schedule.
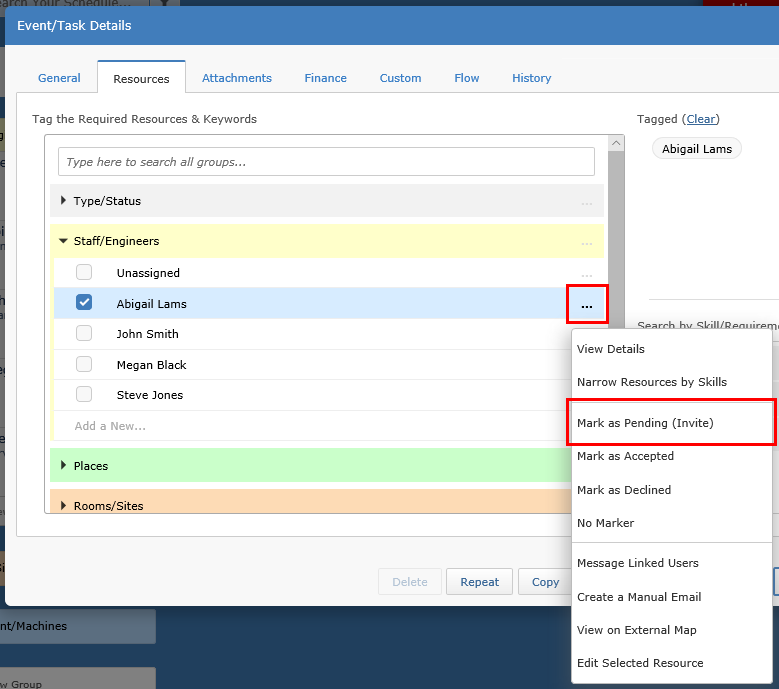
When selecting the resources in the event (next to the resource name click to the options link '...') you can set the condition of the resource as 'Pending', this will add extra options to the email alert to allow the resource to accept or decline the event when they receive the email.
Their response will automatically update the event in the schedule and the last user that updated the event will be notified. A tick or a cross next to the resource name will show the response received after the user clicked the accept or decline button in the invitation email.
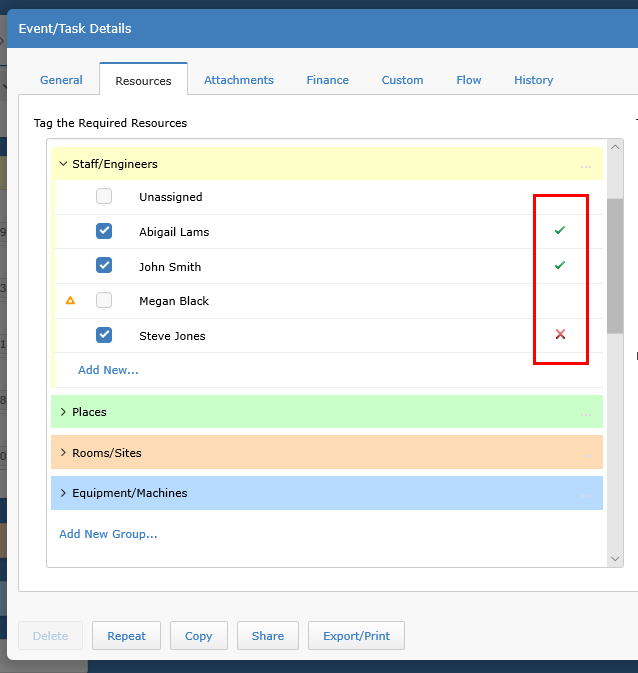
New invitations will be sent if the event is moved and they have not accepted. If they have accepted then an email will be sent with the new event details. Invitations can be resent by clicking Send Email in the Events Share menu.
Emails can be sent in a few ways:
1, Automatically to the people and customers you tag in your event.
2, Manually to the people and customers you tag in your event using Share.
3, Manually to an address by typing it into the email address field of the event.
4, Reminders to the people and customers you tag in your event just before the event is due to start.
5, Invitations to the people and customers you tag in your event, so they can Accept or Decline.
1, Automatic Emails
When an event is added, updated or deleted an email can be automatically sent to the email address of any/all tagged resources.
In the full online version (login from our home page, or press 'Full Online Version' from the app)...
1, Add a valid email address to each of the Resources that you want to send an email to. Access your resources from your Account Settings > Resources page, and click a resources name to edit it.
2, Choose the type of activity that would cause emails to be automatically sent to the resource. Email Alerts are just information telling a person what has been planned. Email Invitations tell a person what you have planned but adds an Accept and Decline button so they can respond.
3, You can use Exceptions to block emails from being sent until a specific resource is tagged in the event. For example you can enable automatic email alerts, but until events are tagged with a resource called Confirmed or Published, nothing is sent. As soon as Confirmed or Published is tagged in the event then emails will be sent.

2, Manual Emails (alerts or invitations)
From within an event you can press the More Actions button to see a sub menu where you can select Email. This will send email alerts, or invitations, to the selected tagged resources with an email address.


Emails can also sent for a batch of events from the List View where you can select many events at once then at the bottom choose the batch option Edit > Send All Emails.
3, Manual Event Email
Add a valid email address to the events Manual Email Address box found by pressing the More Actions button then Email. Every change to this event will be emailed to the email address specified.
You can change the type of emails that are sent to this address in your Advanced Account Settings > Email page.

4, Email Reminders
In the Advanced Account Settings on your Account Settings page you can choose set a default Email Reminder period. In an event you can choose the time period before an event starts, when you would like to receive an email reminder. The reminder emails are sent to the email addresses of all tagged resources with an email address.
Note: If you are also using our desktop software you must be using version 7.8.32 or higher to prevent any compatibility issues with this new cloud reminder feature.
5, Email Invitations
From within an event you can press the More Actions button to see a sub menu where you can select Email. There you can choose to send invitations to the selected tagged resources with an email address.


You can also set that a resource always receives an invitation email when events are added or changed in their schedule.

When selecting the resources in the event (next to the resource name click to the options link '...') you can set the condition of the resource as 'Pending', this will add extra options to the email alert to allow the resource to accept or decline the event when they receive the email.
Their response will automatically update the event in the schedule and the last user that updated the event will be notified. A tick or a cross next to the resource name will show the response received after the user clicked the accept or decline button in the invitation email.


New invitations will be sent if the event is moved and they have not accepted. If they have accepted then an email will be sent with the new event details. Invitations can be resent by clicking Send Email in the Events Share menu.
Last updated, 18 February 2025, 16:12
Still need help? Contact Us
Join Us - Live Webinar
...
Close
Help Topics
Search
Contact Us
