Deep integration with Microsoft Exchange Calendars?
NOTE: Before considering deep integration into your Outlook or Exchange server (which requires special permissions you must set), please try the most popular and simple method of Outlook integration using Subscription Calendars.
Event sharing with other calendars can be done via email alerts and invitations, direct Outlook injection, or calendar subscriptions. This topic will cover direct Outlook injection. For more details on email alerts and invitations see this FAQ page, and calendar subscriptions see this FAQ page.
Send Directly to Outlook
Customising the Appointment Templates
Accessing Exchange Calendars
Resource Mailboxes in Microsoft Exchange
Problems With Outlook Integration
 You can send and receive events to a single or multiple Outlook calendars manually or fully automatically. To connect directly to Outlook you must have at least Microsoft Outlook 2003 installed. Multiple calendar paths allows each resource in your schedule to be linked to a unique Exchange calendar you have access to.
From the Tools menu/Options/Events/Outlook you can type a single calendar location or a calendar location for each resource in the 'Resource and Calendar Mapping' area. For multiple calendars you need the ID of the resource and the calendar location for each entry. E.g...
123||Personal Folders/Calendar
456||Personal Folders/Calendar2
This will link a resource with the ID 123 to the Exchange calendar found at the location 'Personal Folders/Calendar', and a resource with the ID 456 to the Exchange calendar found at the location 'Personal Folders/Calendar2'.
To see the Outlook/Exchange Calendars that Schedule it is allowed to access by your server you can press the button on the right of the Outlook Paths field in the Options. If you dont have a full list you expect to see please read the topics below on MAPI access and resource calendars.
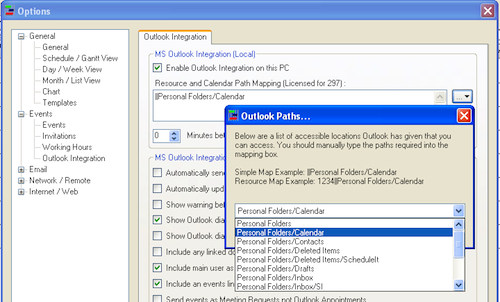
The data sent to Outlook is template based that you can fully customise. This template can be edited in the Options/Other/Template section then select 'Event - Outlook' and press Edit. More detail about template editing and the event fields can be found in this FAQ.
Note: You can see the paths that the Exchange server is allowing Schedule it to see by clicking the button '...' on the right of the Outlook Paths box in Schedule it. To access another users calendar you must have MAPI access (not POP or IMAP) to your Exchange server and must be granted access rights and delegation rights for the calendars you want access to. See topic below for more details on MAPI connections.
Note: Each single Schedule it desktop license can support 3 Outlook paths. Additional licenses can be purchased to support a higher number of paths. E.g. 10 desktop licenses can support 10 Schedule it users and 30 Outlook Paths. Bulk license packs are available which give unlimited sharing and removes the 3:1 limitations.
You can modify the information added to Outlook by editing the templates. The templates used for adding the text to an Outlook appointment, and the ICS file used for creating a new appointment by email, can be edited and changed using the common event tags found in this FAQ.
You can edit the templates from the menu Tools/Options/Templates and choose either 'Event - Outlook appointment' or 'Event - Email alert ICS attachment'. You can also edit these directly with Notepad from the templates folder in 'My Documents/Schedule it 7/templates'.
If you need to store your templates in a common network location for you and other users to access you can change the location where templates are loaded by specifying a new location. In the menu Tools/Options/Network, choose a common path and tick the 'Template Files' tick box. You can now copy your local templates folder to this location and you and all users can also use this location for their templates and other shared files.
The user using Schedule it and integrating with Outlook/Exchange must have full access to all the calendars to allow events to be added. The users own Outlook account must be set so that it can open the mailboxes as an additional mailbox, NOT a shared calendar, then you can use Schedule it to add appointments directly in their calendars folder.
If you have problems with full mailbox access you may have the option to reduce the level of access. If you do not wish to give full access to each users mailbox you can download a program from Microsoft called PFDAVAdmin to manually edit the permissions of the mailboxes. If you give proper permission to the 'Top of information store' and to the 'Calendar', Schedule it is able to add calendar appointments without giving a user complete access to the mailbox.
MAPI or Messaging Application Programming Interface is a proprietary protocol of Microsoft that works over RPC to send and receive requests related to Microsoft Exchange Server. By default Microsoft provides and recommends Office Outlook as the MAPI access software for Exchange Mail Servers. But whenever you try to access Exchange Server using MAPI you usually get confused because there is no option in Outlook that specifies MAPI access.
Some facts on why MAPI is preferred as Exchange Client. Basically it is only because with MAPI you can access almost all feature of Microsoft Exchange but with other protocols such as POP or IMAP, this type of access is almost impossible. Although HTTP or OWA provides almost same functionality of MAPI but again it is browser dependent.
Schedule it uses MAPI through your local Outlook to access your Microsoft Exchange calendars.
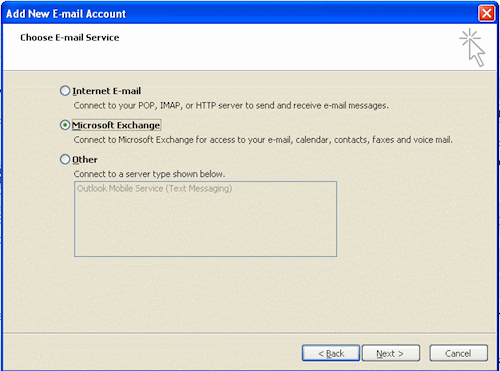
For the purpose of this tutorial we have used Office Outlook 2007, but this will work on all versions of outlook like XP, 2003, 2007 and 2010. Start by creating a new profile which you can do through control panel, On the profile creation page, Select Microsoft Exchange as an option when choosing Email Service
Then Type the URL of your Exchange server and your Active Directory user name and click Next
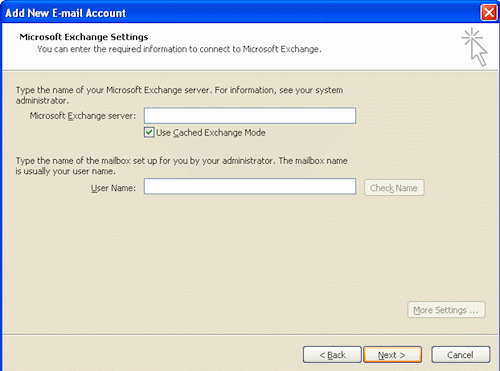
Doing this will successfully configure your Outlook Profile to access Exchange Server using MAPI.
A resource mailbox is a feature in Microsoft Exchange Server that is used to manage resources in your company. A resource mailbox is typically configured by an administrator. In other words, you will need administrative rights and privileges to execute this task.
If you using resource mailboxes for shared calendars in Exchange you will need to add the resources in Outlook first so they are available to Schedule it to access. From the Outlook Menu File -- Account Settings -- Advanced -- Add (All Resources Mailboxes).
Configure Resource Mailbox with Outlook Calendar
1, Launch Outlook after you are done configuring the resource mailbox with Outlook.
2, Click on 'Tools' and select 'Options.'
3, Click on 'Calendar Options.'
4, Click on 'Resource Scheduling...' Place a check mark next to all the three processing meeting requests: 'Automatically accept meeting requests and process cancellations,' 'Automatically decline conflicting meeting requests' and 'Automatically decline recurring meeting requests.'
5, Click on the 'Set Permissions...' button. Place a check mark next to 'Set standard resource permissions for all users.' This will make sure that all users are allowed to view as well as book appointments. However, they can only edit or remove their own appointments. Hit 'OK' to end task.
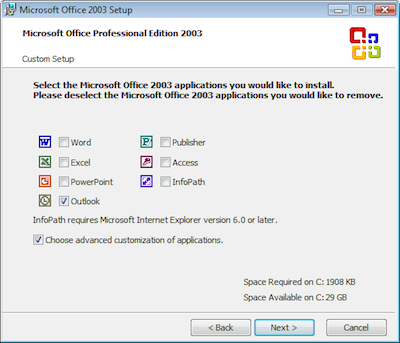
If you are having any problems it maybe you installed Microsoft Office before the .Net framework then some essential files may not have been installed, which will results in errors when trying to send events to Outlook. From the Windows Control Panel, Add and Remove Programs, Select Microsoft Office, Or insert your Office CD and start the setup...
1, Select to 'Add or Remove Features'
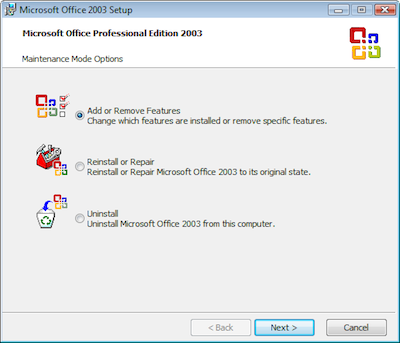
2, Without removing any checked items, select 'Choose advanced customization'
3, From the list under 'Outlook', '.Net Programmability Support', select 'Run from My Computer'
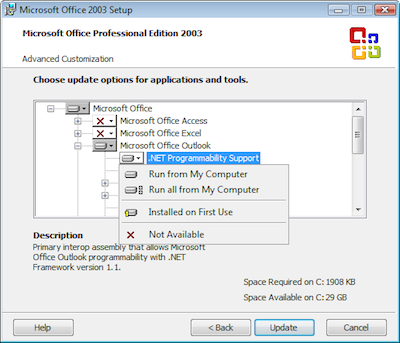
4, Press 'Update', to finish.
outlook, exchange, 2003, 2005, 2008, 2010, 2012, xp, microsoft, sync, synchronisation, server, exchange intergration)
Microsoft Outlook and Exchange Calendar Integration
Event sharing with other calendars can be done via email alerts and invitations, direct Outlook injection, or calendar subscriptions. This topic will cover direct Outlook injection. For more details on email alerts and invitations see this FAQ page, and calendar subscriptions see this FAQ page.
Send and Receive Directly with Outlook
 You can send and receive events to a single or multiple Outlook calendars manually or fully automatically. To connect directly to Outlook you must have at least Microsoft Outlook 2003 installed. Multiple calendar paths allows each resource in your schedule to be linked to a unique Exchange calendar you have access to.
From the Tools menu/Options/Events/Outlook you can type a single calendar location or a calendar location for each resource in the 'Resource and Calendar Mapping' area. For multiple calendars you need the ID of the resource and the calendar location for each entry. E.g...
123||Personal Folders/Calendar
456||Personal Folders/Calendar2
This will link a resource with the ID 123 to the Exchange calendar found at the location 'Personal Folders/Calendar', and a resource with the ID 456 to the Exchange calendar found at the location 'Personal Folders/Calendar2'.
To see the Outlook/Exchange Calendars that Schedule it is allowed to access by your server you can press the button on the right of the Outlook Paths field in the Options. If you dont have a full list you expect to see please read the topics below on MAPI access and resource calendars.

The data sent to Outlook is template based that you can fully customise. This template can be edited in the Options/Other/Template section then select 'Event - Outlook' and press Edit. More detail about template editing and the event fields can be found in this FAQ.
Note: You can see the paths that the Exchange server is allowing Schedule it to see by clicking the button '...' on the right of the Outlook Paths box in Schedule it. To access another users calendar you must have MAPI access (not POP or IMAP) to your Exchange server and must be granted access rights and delegation rights for the calendars you want access to. See topic below for more details on MAPI connections.
Note: Each single Schedule it desktop license can support 3 Outlook paths. Additional licenses can be purchased to support a higher number of paths. E.g. 10 desktop licenses can support 10 Schedule it users and 30 Outlook Paths. Bulk license packs are available which give unlimited sharing and removes the 3:1 limitations.
Customising the Appointment Templates
You can modify the information added to Outlook by editing the templates. The templates used for adding the text to an Outlook appointment, and the ICS file used for creating a new appointment by email, can be edited and changed using the common event tags found in this FAQ.
You can edit the templates from the menu Tools/Options/Templates and choose either 'Event - Outlook appointment' or 'Event - Email alert ICS attachment'. You can also edit these directly with Notepad from the templates folder in 'My Documents/Schedule it 7/templates'.
If you need to store your templates in a common network location for you and other users to access you can change the location where templates are loaded by specifying a new location. In the menu Tools/Options/Network, choose a common path and tick the 'Template Files' tick box. You can now copy your local templates folder to this location and you and all users can also use this location for their templates and other shared files.
Accessing Exchange Calendars
The user using Schedule it and integrating with Outlook/Exchange must have full access to all the calendars to allow events to be added. The users own Outlook account must be set so that it can open the mailboxes as an additional mailbox, NOT a shared calendar, then you can use Schedule it to add appointments directly in their calendars folder.
If you have problems with full mailbox access you may have the option to reduce the level of access. If you do not wish to give full access to each users mailbox you can download a program from Microsoft called PFDAVAdmin to manually edit the permissions of the mailboxes. If you give proper permission to the 'Top of information store' and to the 'Calendar', Schedule it is able to add calendar appointments without giving a user complete access to the mailbox.
MAPI or Messaging Application Programming Interface is a proprietary protocol of Microsoft that works over RPC to send and receive requests related to Microsoft Exchange Server. By default Microsoft provides and recommends Office Outlook as the MAPI access software for Exchange Mail Servers. But whenever you try to access Exchange Server using MAPI you usually get confused because there is no option in Outlook that specifies MAPI access.
Some facts on why MAPI is preferred as Exchange Client. Basically it is only because with MAPI you can access almost all feature of Microsoft Exchange but with other protocols such as POP or IMAP, this type of access is almost impossible. Although HTTP or OWA provides almost same functionality of MAPI but again it is browser dependent.
Schedule it uses MAPI through your local Outlook to access your Microsoft Exchange calendars.
For the purpose of this tutorial we have used Office Outlook 2007, but this will work on all versions of outlook like XP, 2003, 2007 and 2010. Start by creating a new profile which you can do through control panel, On the profile creation page, Select Microsoft Exchange as an option when choosing Email Service

Then Type the URL of your Exchange server and your Active Directory user name and click Next

Doing this will successfully configure your Outlook Profile to access Exchange Server using MAPI.
Resource Mailboxes in Microsoft Exchange
A resource mailbox is a feature in Microsoft Exchange Server that is used to manage resources in your company. A resource mailbox is typically configured by an administrator. In other words, you will need administrative rights and privileges to execute this task.
If you using resource mailboxes for shared calendars in Exchange you will need to add the resources in Outlook first so they are available to Schedule it to access. From the Outlook Menu File -- Account Settings -- Advanced -- Add (All Resources Mailboxes).
Configure Resource Mailbox with Outlook Calendar
1, Launch Outlook after you are done configuring the resource mailbox with Outlook.
2, Click on 'Tools' and select 'Options.'
3, Click on 'Calendar Options.'
4, Click on 'Resource Scheduling...' Place a check mark next to all the three processing meeting requests: 'Automatically accept meeting requests and process cancellations,' 'Automatically decline conflicting meeting requests' and 'Automatically decline recurring meeting requests.'
5, Click on the 'Set Permissions...' button. Place a check mark next to 'Set standard resource permissions for all users.' This will make sure that all users are allowed to view as well as book appointments. However, they can only edit or remove their own appointments. Hit 'OK' to end task.
Problems With Outlook Integration
If you are having any problems it maybe you installed Microsoft Office before the .Net framework then some essential files may not have been installed, which will results in errors when trying to send events to Outlook. From the Windows Control Panel, Add and Remove Programs, Select Microsoft Office, Or insert your Office CD and start the setup...
1, Select to 'Add or Remove Features'

2, Without removing any checked items, select 'Choose advanced customization'

3, From the list under 'Outlook', '.Net Programmability Support', select 'Run from My Computer'

4, Press 'Update', to finish.
outlook, exchange, 2003, 2005, 2008, 2010, 2012, xp, microsoft, sync, synchronisation, server, exchange intergration)
Last updated, 5 April 2024, 10:53
Still need help? Contact Us
Join Us - Live Webinar
...
Close
Help Topics
Search
Contact Us
